
Espalier DIY: A Small Space Garden Solution
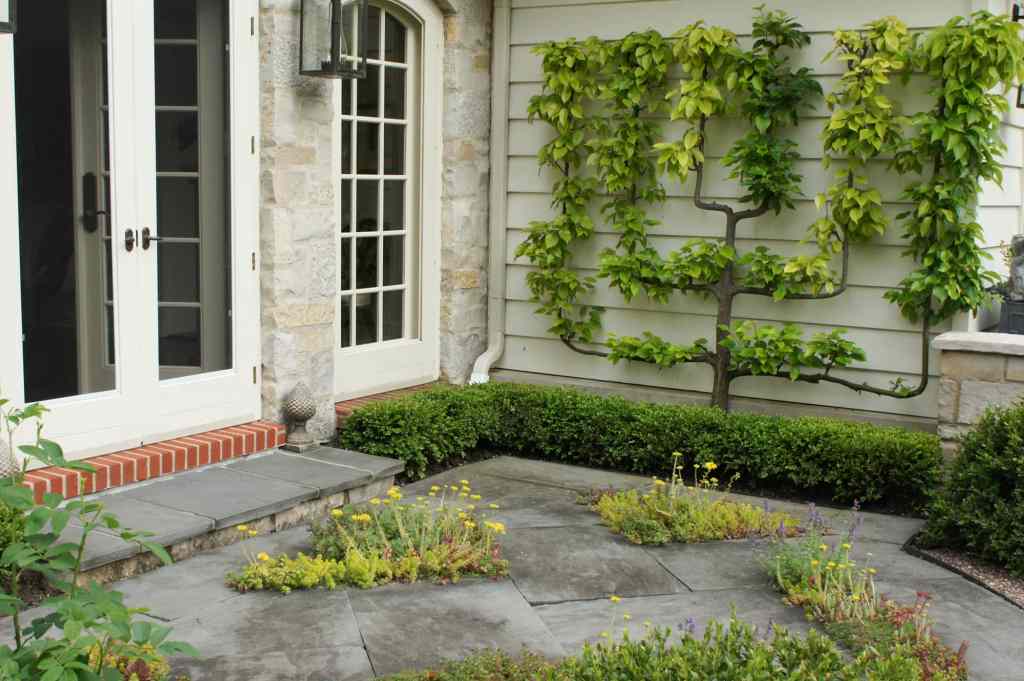 In 2012, I was scouting magazine locations and came across a garden along Chicago’s North Shore unlike any I had ever seen. What stood out was the tree positioned in a narrow planting bed on a north-facing wall and I was instantly intrigued. So much so that I knew I had to figure out how to put something like that in my small garden. The homeowner, Kim Visokey (a self-proclaimed Garden Freak), had planted an espaliered Kieffer pear tree that produced plenty of edible fruit.
Espalier is a pruning technique developed by a French monk, Father Legendre, in the mid 1600s, who stumbled upon the idea purely by happenstance. Food production can be a challenge, especially when you’re faced with the task of feeding a monastery. As the saying goes, necessity is the mother of invention. Fruit buds on the trees planted around the monastery were often destroyed by late-season frosts. But Legendre noticed that the trees planted closest to the monastery were better protected from the elements and suffered less fruit damage as a result. He began planting trees near walls, but space was an issue and he was forced to prune to keep them within the confines of tighter digs. To his surprise, the trees responded by producing even more fruit.
Over 350 years later, espalier is especially relevant to modern small-space gardeners who want something aesthetically pleasing, easily accessible and good to eat. But you’re not limited to fruit trees with this design. Any dwarf tree will respond well provided the shaping and pruning is begun when the branches are young and supple.
 The idea lay dormant but not forgotten until last summer when I toured another garden with an espaliered Kieffer pear growing in a narrow bed along a garage wall.
Fast forward several years and one polar vortex that decimated my beloved Zephirine Drouhin rose along the front sidewalk and Bingo!, a spot had finally become available. The area was home to a menagerie of plants after the rose died, but nothing really impressed me. Seemed like the perfect time to espalier!
 I found the tree, a dwarf honeycrisp apple, before we built the espalier structure and planted it right away. My budget doesn’t allow for an established espaliered tree so I’m starting from scratch with a DIY attitude. I admit I was seduced by the thought of honeycrisp apples in our garden but I’m second guessing that choice after several trusted garden friends were very discouraging. Apples have a propensity for worms and disease and rely on sprays and insecticides. Not my thing. They also need a pollinator, but I have a crabapple nearby and read that a crab can pollinate an apple provided they have the same bloom period. They do, but if it doesn’t work out, I’ll find a Kieffer pear or a redbud, my favorite tree.
 While many espalier forms can be anchored to a wall, we didn’t want to drill into the siding and opted for a free standing support. Once I had cleared the space, we began digging two holes for the 4×4 cedar posts which were located about a foot from the wall to allow good air flow around the tree. At only 28 inches deep, the space from the garage wall to the sidewalk is pretty narrow. As we got deeper, my husband removed soil by hand and found it more difficult to reach the bottom of the hole.
 Until our neighbor came through with a post hole digger.
 We measured to be certain we had dug past the 42-inch frost line. The depth varies across the country. In winter, the ground freezes and can “frost jack” poured-in-place footings if the hole is too shallow. Check your local building codes to determine the proper depth for post holes and be sure to call JULIE (Joint Utility Locating Information for Excavators) or your state’s equivalent before you dig. The free service locates underground utility lines so you don’t accidentally.
We used bags of Quikrete, a fast setting concrete mix, and moved quickly setting the posts in place. We followed the instructions on the bag to determine how many we would need based on the depth and width of the hole. I held the posts in place as my husband added the concrete mix. Wear a mask (or don’t breath) while the dry mix is being added. It’s incredibly dusty and unsafe to breathe. Once the concrete mix is in place, we added the required amount of water and held the post in place until it set up.
 We used a level to make sure the post was properly positioned. The concrete sets up fast so we worked quickly to make sure it wasn’t catawampus.
 Once we figured out the location of our lowest wire, which was about 15 inches from the ground, we used a string level to mark the other post to ensure that our wires would be level. From that first mark, we did four more rows spaced 18 inches apart.
 All the holes were drilled and fitted with stainless steel eye bolts.
 And secured with stainless steel washers and nuts.
Plastic coated galvanized wire rope (3/32″) was fed through the bolts on the right post and secured with clamp sets. Galvanized wire corrodes over time and can wound the branches so the plastic adds a protective barrier between them and helps preserve the wire.
 Stainless steel turnbuckles were used to connect to the eye bolts on the left post. Turnbuckles make it easier to tighten the wire if it should loosen. The wire was fed through the end and secured with more clamp sets. A 2×4 was notched into the top of the posts to prevent them from caving in and we capped them with copper finials which will look lovely as the metal ages and develops a verdigris patina.
 Once the structure was complete, I began limbing up the tree and securing the branches to the wire with bits of old stockings.
 For now I’m going with a tiered cordon design where the branches travel horizontally along the wire, but I may turn it into a candelabra once the branches grow a bit. The structure is certainly tall enough to accommodate that design. I underplanted the espalier with orange Darwin tulips for the spring and Allium ‘Millenium’ to carry it through summer and fall.
This winter I’ll be learning pruning techniques and gleaning inspiration from the espalier at River Road Farms in Tennessee (I would LOVE to visit someday). It’s my first fruit tree rodeo and spurs aren’t just for cowboys. Wish me luck!
What fruit tree would you espalier? I’d love to know!


I remember seeing that patio in a magazine and thinking that was an interesting and beautiful idea and then my next thought was how impractical it was and I’d hate to always be stepping over the pretty planting’s. I would love to have an espalier tree, they’re just so interesting to look at, but it wouldn’t work at this house.
Hi Gigi, I produced a story for Better Homes and Gardens a few years ago, perhaps that’s where you saw it. It is a cool idea but I had the same thought. How would you arrange chairs on the patio? Thanks for sharing your thoughts and I’ll update the status of the espalier in the spring. Thanks for reading and Happy New Year!
I would love to see an update of the apple tree! I am considering something like this along our fence or garage. I am thankful I came across your instructions!
Hi Anna! Unfortunately the espaliered apple tree didn’t make it. The site is such a challenge. It’s narrow, bound by cement on three sides and the pH is high because of it. I decided to plant a climbing rose and a clematis in the space and so far they seem to like the spot.